User guide
Using the Fiji/ImageJ GUI
Open the Fiji/ImageJ script editor (Press the [ key).
Open the script QM_fiji.py, which is in the directory GMM_Image_Quality/main/. Run the script (Ctrl-R) The main menu will appear.

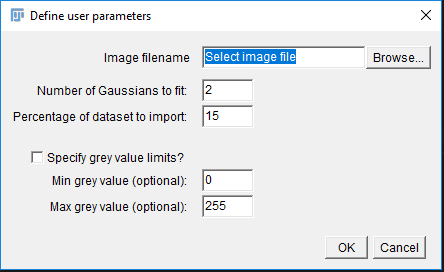
To load an image, click on “Load image and settings”. A dialog to select parameters for image quality assessment will pop up. Select an image (.tif) using the “Browse…” button, enter number of Gaussians to fit (usually = number of materials in the specimen), percentage of dataset to import (typically 10-15%) and whether the grey value pixel intensities should be limited or not. Any limits set on grey values will be ignored if the “Specify grey value limits?” checkbox is unticked. If the checkbox is ticked, grey value pixel intensities outside the specified range will be ignored when fitting the Gaussian mixture models.
All user parameters are saved in the results directory, which is located at <image_filename>_results/.
Click OK to continue.
To fit the Gaussian mixture model, click on “Fit Gaussian Mixture Model” in the main menu. This will take a while depending on the size of your image and the complexity of the Gaussian mixture model fitting.
When complete, a window will pop up with a histogram of the image pixel intensities and the fitted Gaussian components.
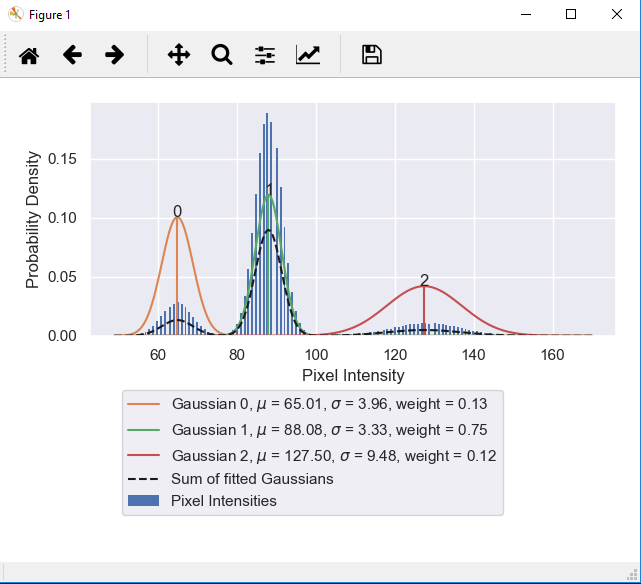
Close the window to continue. (The histogram will be saved in the results directory) The results of the Gaussian mixture model fitting, user parameters and results directory will be printed to output in the Fiji script editor.
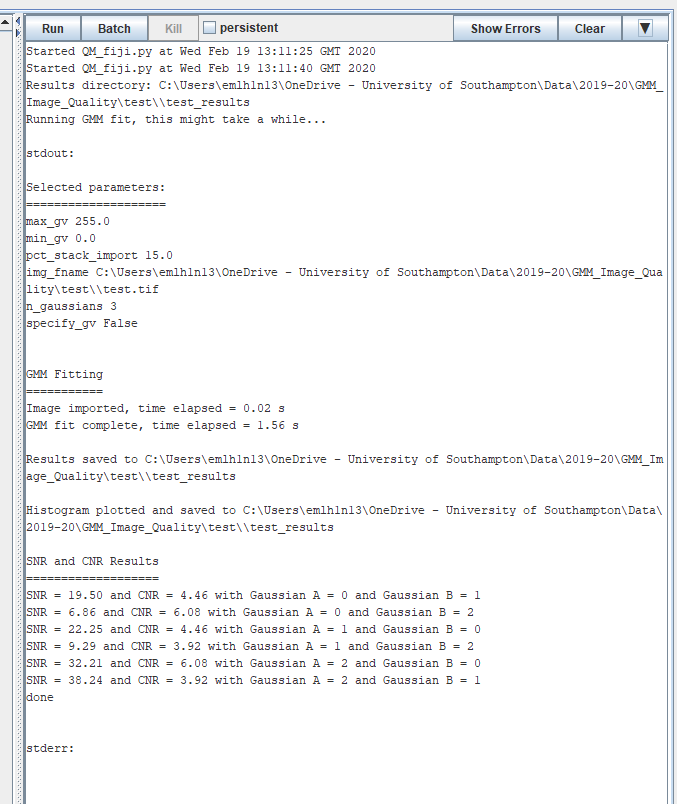
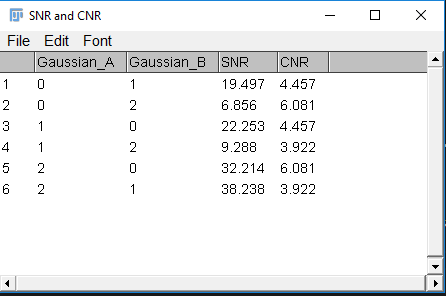
To view the calculated SNR and CNR as a ResultsTable in Fiji, click on “Show SNR and CNR as Results Table”. These results are automatically saved as .csv files in the results directory.
The equations to calculate SNR and CNR are shown below:
where mu is the mean and sigma is the standard deviation of the fitted Gaussian.
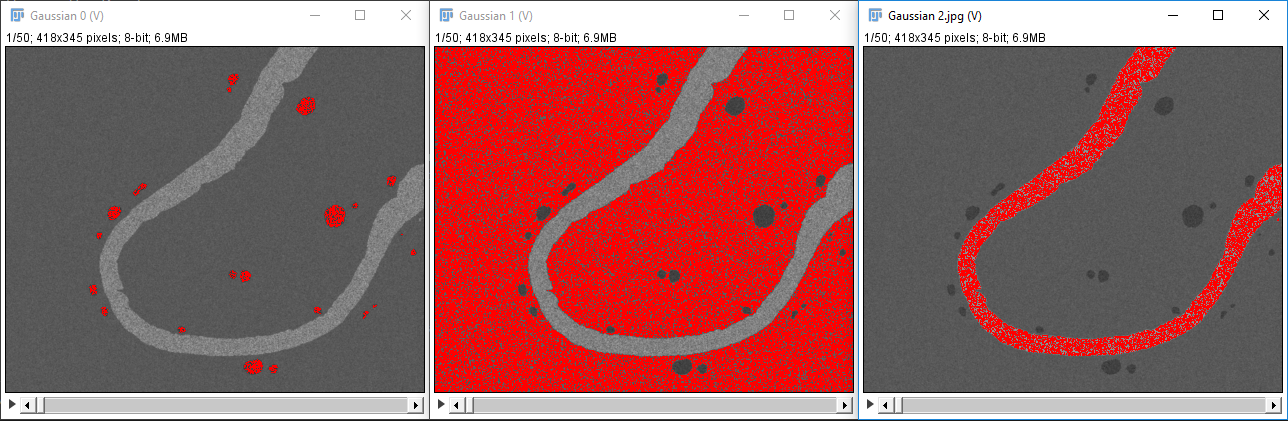
To check which materials correspond to each Gaussian component, click on “Show thresholded stack”. Virtual stacks of the image will open with the pixel intensities thresholded to the mean of each Gaussian component +/- 1 x standard deviation of the component. The thresholded image can be saved with the selected pixels highlighted if required (File > Save As > Jpeg…).
Python scripting
The GMM image quality tool can be imported as a library into Python scripts.
To use the entire workflow (load images, fitting Gaussians, calculating SNR and CNR and saving results), import QM_runner.py as a library. For example,
sys.path.append(<main repository for GMM_Image_Quality>) # add main repository to path to load library
import QM_runner
QM_runner.QM_runner(img_fname, n_gaussians, min_GV = 0, max_GV = 255, specify_gv = False, pct_stack_import = 10.)
If more flexibility in the workflow is required, each step of the workflow can be imported individually. The individual steps are as follows:
- QM_load - Loads a specified percentage of an image stack with a specified filename, with optional limits placed on pixel intensities imported.
- GMM_fit - Fits a specified number of Gaussian components to the image loaded by QM_load; extracts mu, sigma and weight results from the Gaussian mixture model; saves results as .csv files; plots fitted Gaussian components and image pixel intensities and saves the plot.
- QM_calc - Calculates SNR and CNR from every unique combination of Gaussian components from GMM_fit.
An example of how these individual steps are combined in a Python script can be found under examples/Benchmarking.py.